Spreading Joy with Rainbows
Posted by Sharon Oldfield on
Back in the 70’s I used to lie in bed at night imagining what life beyond the year 2000 would look like. Naturally, there was the fantasy of having a nice house, maybe some pets, a husband (don’t forget this was way before the term life-partner was coined), there were a couple of kids in my vision and I pretty much knew way back then, at 9, that I would be a teacher.
Funnily enough there was never the notion that I’d be living in a draconian, dystopian lockdown form of existence, I was nine for goodness sake, stuff like that didn’t happen and my obsession with sci-fi and fantasy movies hadn’t kicked in at that point. The Rainbows I painted were all about the sunshine after the rain, the Rainbow that symbolised the end of ‘the Great Flood’ or just pretty things to draw because I was obsessed with organising my coloured pencils in Rainbow order (nothing’s changed there you’ll be pleased to know).
Fast forward and I’m approaching 50 this year and yes, I became a teacher, there’s a house and all that stuff but the Rainbow drawings that my 9 year old daughter is currently creating reflect a different type of hope. Children and grown ups around the world are joining together to share a little joy by placing Rainbows in their windows for others to find as they go out on their self-isolating walks. You can read more about this here. https://www.bbc.co.uk/newsround/51953553
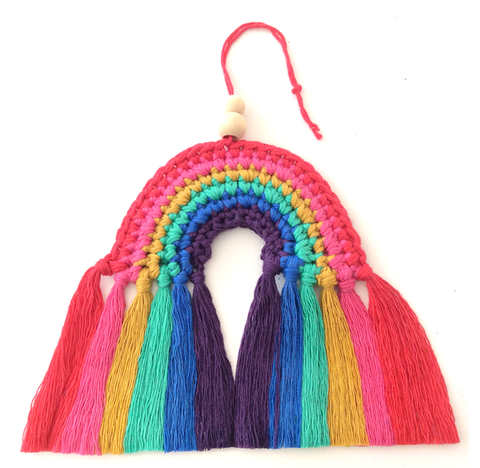
As soon as I knew about the Rainbows in windows initiative I had to join in and crochet a Rainbow too. Rather than reinvent the wheel (there are hundreds of beautiful rainbows out there on the web) I found a great free pattern on the wonderful DROPS website that I thought you might like to make too. I’ve adapted the pattern to make my Rainbow bigger and I’ve added some Macramé inspired tassels too. I hope you like it and I hope I inspire you to create your own version. It’s a great stash busting project, so I wouldn’t worry too much about having the exact colours that the pattern suggests, just as long as you find a Rainbow sequence of colours you’ll be ok. I’m sure it would look lovely in pastel shades too.
HERE'S HOW I MADE MY RAINBOW
THE PATTERN
The pattern is from Garnstudio Drops Design. It is called 'Holiday Rainbows' and can be found here. https://www.garnstudio.com/pattern.php?id=9449&cid=19

YOU WILL NEED:
- To make the Rainbow you can use any yarn you have in your stash (preferably cotton but that is not essential), however the pattern asks for DROPS Paris in the following shades:
- 12 Red
- 06 Cerise
- 41 Mustard
- 11 Opal Green
- 09 Royal Blue
- 08 Dark Purple
- The pattern tells you to use one strand of the Drops Paris with a 3mm hook, however I used two strands of Paris held together with a 5mm hook, to make my final Rainbow bigger.
- Wooden beads (or any beads you have)
- Scissors
- Darning needle
- Comb (if you are using cotton yarn)
INSTRUCTIONS
Make your Rainbow following the Holiday Rainbows pattern from DROPS Design, remember to double up your yarn and increase your hook size if you would like your Rainbow to be bigger like mine. Drops have a fabulous video to help guide you through the pattern.
1. Crochet the first 5 rounds following the pattern using two strands of Drops Paris held together, using a 5mm crochet hook.


2. Darn in your ends - turn work over and sew in the ends, trim.


3. Fold the Rainbow in half and crochet the final rainbow stripe in red. I added one dc into each stitch.


4. Now add the tassels:
- Cut 10 strands of each shade 25cm long
- Hold 5 strands together, fold in half
- Insert the hook from the back to the front, pull loop through with a crochet hook - you may need to go up a few hook sizes
- Insert yarn ends into the loop and pull tight


5. You can leave your tassels as they are but if you are using a cotton yarn now is the time to brush out your tassels to make them nice and full. Start near the bottom of the tassels and work up towards the knot.


6. I use a stiffening spray (I bought mine here) to keep the tassels neat and tidy, they have a tendency to try and curl back up if not.


7. Cut a piece of red yarn 30cm long and attach as a hanging loop. Thread beads onto the hanging loop.

8. Trim the tassels in a straight line with sharp scissors. I use a piece of paper to help achieve a straight edge.


Tah Dah!
There you go a beautiful Rainbow for your window or it would look lovely in a Nursery or as part of a mobile.

I hope you have enjoyed this 'How To' tutorial, its lovely to see all the colours isn't it? Please show me your Rainbows on my Facebook page , where you can also see what I get up to next :-)
Happy Hooking!
Sharon x
How To Make a Rainbow Decoration from Cotton Pod on Vimeo.
Share this post
- 0 comment
- Tags: Rainbow Decoration
0 comment